(all photos)
(home)
Although it worked fine in this application, the 16 tooth worm gear on
my old ATW's threading dial was badly worn. Its supposed to be a worm
gear but this one sort of looks like a plain old spur gear that was worn
in. When I got the lathe, the threading dial was very stiff, it may
have never been oiled. I think this caused the excesive wear on the
gear.

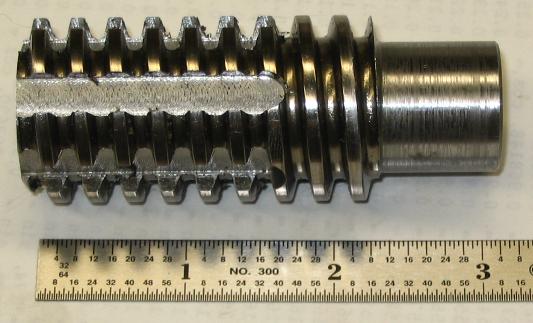
In 2005 I got a length of 4140 1 1/4 - 4 acme rod from
Green Bay Manufacturing.
It was fun to turn the shank, nice 20' long stringy chips. I wasn't
paying enough attention to feeds & speeds to get a good finish.
Since I'm using the hob to cut brass I didn't bother trying to put in
top relief or additional hardening. I should have cut the notches
deeper, but these are enough to cut- though slowly.
In Dec 2006 I finally got around to getting the project going again. I
made a mandrel to mount the blank on the dividing head so I could put in
the gashes that the hob will use to spin the blank while it forms the
teeth later on. Feeds & speeds are improving. :)

I got the blank straightened out too. When I put the bore in I'd
forgotten what happens when you try to put in a bore to size with a
twist drill; hole is neither straight or round. So bore it out, solder
in a plug, drill & bore that to diameter. Then cut away the solder
which got all over everything without messing up the dimensions. I
forgot to put strips of aluminum between the chuck jaws and the gear, so
damaged the gear's finish- no big problem, just sloppy.

And then into the dividing head. I computed a 4 degree lead from
Machinery's Handbook, so approximated that by the scale on the dividing
head. I cut the teeth to the depth of the addendum of the final tooth
profile.

With the gashes in, I set up a jig to hob the gear.
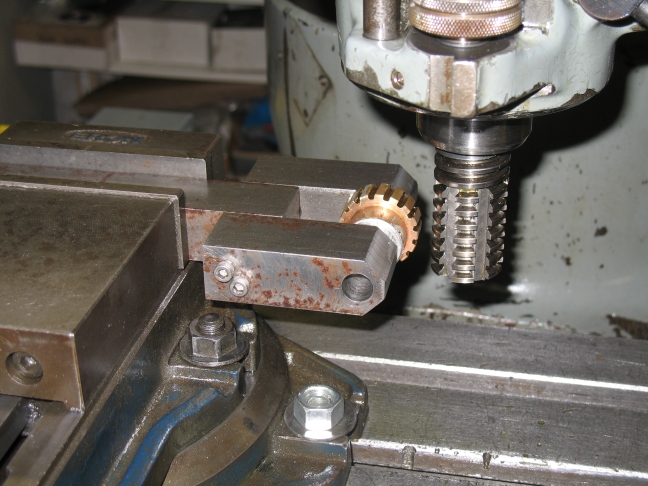
February 2007
I finally got around to hobbing the gear;

I recorded an AVI file of it running,
hobbing-gear.avi
(transcoded to x264, which may help w/ some players)
hobbing-gear.mp4
The lack of relief in the bottom of the thread made finishing slow, and
the 4140 did begin to dull so hardening is in order, even for brass. But
I got decent gear out.


I wasn't confident about drilling the new gear for the taper pin, so put
setscrews in instead. Here is the mounted gear.

And the face of the threading dial after I added some paint on the
background.

;;; eof